-
React-query 이용해서 무한 스크롤 구현하기(feat. Spring + Java)개발/React 2024. 6. 4. 17:00
직접 구현할 수 있는 부분에도 라이브러리를 쓰는 걸 별로 좋아하지 않지만, react-query는 회사에서 많이 쓰는 기술이기도 하고 철학이나 인사이트를 얻을 수 있는 점에서 공부할 거리가 있긴 하다. useInfiniteQuery를 이용해서 무한 스크롤을 구현하려는 사람에게 조금이나마 도움이 되기를 바란다.
기술환경
- Next.js 14.1.3
- @tanstack/react-query: 5.28.4(react-query 버전이 올라가면서 @tanstack이 붙음)
- Spring boot starter: 3.2.3
- Spring boot starter security: 3.2.3(spring security core: 6.2.2)
- Spring data jpa: 3.2.3(hibernate core: 6.4.4.Final)
주안점
- 페이지네이션과 사실상 똑같다
- 페이지의 끝(개발자가 정해놓은 영역)에 도달했을 때 자동으로 다음 페이지 정보를 가져오면 된다
- 특정 영역에 대한 도달 확인은 web api인 IntersectionObserver를 이용해 직접 구현한다
- 관련한 라이브러리가 있긴 하지만 직접 구현해보자
- 기능이 추상화되어 있다 보니까 공식문서를 봐도 바로 파악하기 어려울 수 있다
먼저 공식 문서를 조금 살펴보자. 여기에서 중점적으로 볼 것은 useInfiniteQuery를 호출할 때 보이는 getNextPageParam 함수와 반환값으로 받는 fetchNextPage, hasNextPage 그리고 데이터를 가져오는 사용자 정의 함수다. 이 네 가지만 이해하면 사실상 반은 구현한 거다.
프론트엔드
기능들
getNextPageParam
이 함수는 다음 페이지를 확인할 때 호출된다. 공식 문서에는
getNextPageParam: (lastPage, pages) => lastPage.nextCursor으로 정의되어 있는데, 편한 방법으로 구현하면 된다. 가장 핵심 기능을 담당한다. 자세한 건 뒤에서 다루겠지만 백엔드에서 데이터를 어떻게 내려줘야 할지 합을 맞춰야 하는 부분이다. 백엔드와 추가적으로 합을 안 맞추고 구현하려면 Next.js에서 제공하는 라우트 핸들러를 사용해서 반환 값을 새로 생성해주면 된다. 여기에선 라우트 핸들러를 사용하는 방법까진 소개하지 않는다. 어쨌든 백엔드 서버에서 데이터를 내려줄 때 nextCursor(다음 페이지에 대한 정보)를 포함해야 한다. 우리는 nextPage라는 이름으로 구현할 것이다.
hasNextPage
getNextPageParam 함수가 null이나 undefined가 아닌 값을 반환하면 true가 된다.
fetchNextPage
다음 데이터를 자동으로 가져온다. 다음 페이지에 대한 정보를 getNextPageParam 함수로 얻을 수 있기 때문이다.
IntersectionObserver
공식문서에서는 대략적인 흐름만 파악하면 될 것 같다. 리액트에서 페이지의 끝을 감지하기 위해 아래 쪽에 div 요소를 하나 삽입하고 이를 useRef 훅의 반환값으로 연결한다. 그리고 이 ref 값을 이용해 useIntersectionObserver 훅을 완성해보자. 기본 틀은 다음과 같다. useIntersectionObserver에 대한 설명을 마친 후에 나머지 코드를 추가한다.
const ref = useRef<HTMLDivElement>(null);
const elementEntry = useIntersectionObserver(ref, {});

return (
<div className="posts">
  {data?.pages?.map((item, index) => (
    <React.Fragment key={index}>
      {item.data.map((post: PostProps) => (
        <PostBox post={post} key={post.id} />
      ))}
    </React.Fragment>
  ))}
  <div className="posts__bar" ref={ref}></div>
</div>
);
useIntersectionObserver.ts
import { RefObject, useEffect, useState } from "react";

const useIntersectionObserver = (
  elementRef: RefObject<Element>,
  // IntersectionObserver 객체를 생성할 때 필요한 옵션
  { threshold = 0.1, root = null, rootMargin = "0px" }
): IntersectionObserverEntry | undefined => {

  // IntersectionObserverEntry는 감지되는 영역에 대한 정보를 담고 있다
  const [entry, setEntry] = useState<IntersectionObserverEntry>();

  // 특정 영역이 감지될 때 이 콜백함수의 인자로 감지된 영역에 대한 정보를 함수의 인수로 넣어준다
  // 배열로 넣어주는데 우리는 첫 번째 정보만 필요하기 때문에 [entry]로 축약할 수 있다
  // entry는 반환 값인데, 이것이 갱신될 때 데이터를 추가로 불러오기 때문에 리렌더링을 위해
  // useState로 상태값을 지정한다
  const updateEntry = ([entry]: IntersectionObserverEntry[]): void => {
    setEntry(entry);
  };

  useEffect(() => {
    // current가 실제 요소를 뜻하는 target이다
    const node = elementRef.current;
    const isIOSupport = !!window.IntersectionObserver;

    // IntersectionObserver을 문제 없이 사용하기 위해 확인한다
    if (!node || !isIOSupport) {
      return;
    }

    const options = { threshold, root, rootMargin };
    const observer = new IntersectionObserver(updateEntry, options);

    observer.observe(node);

    return () => observer.disconnect();
  }, [elementRef, root, rootMargin, threshold]);

  return entry;
};

export default useIntersectionObserver;
IntersectionObserver를 생성할 때 삽입하는 옵션 중에 root를 null로 지정하면 root가 뷰포트가 된다. 즉 화면(뷰 포트)과 특정 영역이 treshold 비율만큼 교차하게 되면 콜백 함수를 호출하는 형식이며 여기에선 updateEntry가 콜백함수다. 콜백함수를 호출할 때 인수로 entry 값을 배열 형태로 넣어주는데 entry 객체는 교차에 관한 정보를 담고 있다. isIntersection이라는 필드를 통해 교차 여부를 판단한다.
// lib.dom.d.ts
interface IntersectionObserverEntry {
    /** [MDN Reference](https://developer.mozilla.org/docs/Web/API/IntersectionObserverEntry/boundingClientRect) */
    readonly boundingClientRect: DOMRectReadOnly;
    /** [MDN Reference](https://developer.mozilla.org/docs/Web/API/IntersectionObserverEntry/intersectionRatio) */
    readonly intersectionRatio: number;
    /** [MDN Reference](https://developer.mozilla.org/docs/Web/API/IntersectionObserverEntry/intersectionRect) */
    readonly intersectionRect: DOMRectReadOnly;
    /** [MDN Reference](https://developer.mozilla.org/docs/Web/API/IntersectionObserverEntry/isIntersecting) */
    readonly isIntersecting: boolean;
    /** [MDN Reference](https://developer.mozilla.org/docs/Web/API/IntersectionObserverEntry/rootBounds) */
    readonly rootBounds: DOMRectReadOnly | null;
    /** [MDN Reference](https://developer.mozilla.org/docs/Web/API/IntersectionObserverEntry/target) */
    readonly target: Element;
    /** [MDN Reference](https://developer.mozilla.org/docs/Web/API/IntersectionObserverEntry/time) */
    readonly time: DOMHighResTimeStamp;
}
useIntersectionObserver을 사용하는 쪽의 코드를 완성해보자. 다음은 데이터 페칭 함수와 useInfiniteQuery 사용 부분이다.
const fetchPosts = async (page: number, userId: number | undefined) => {
  const params = {
    page,
    userId,
  };
  // userId가 아예 전달되지 않을 때가 있어 query string을 동적으로 구성
  // URLSearchParams 함수를 활용
  const queryString = createDynamicUrlWithObject(params);
  const res = await axios.get(`/api/post/list?${queryString}`);

  // axios를 이용하면 data 필드에 데이터가 들어있다
  return res.data;
};

// Within a React component
const ref = useRef<HTMLDivElement>(null);
const elementEntry = useIntersectionObserver(ref, {});
const isPageEnd = !!elementEntry?.isIntersecting;

const { data, fetchNextPage, hasNextPage } = useInfiniteQuery({
queryKey: ["posts"],
queryFn: ({ pageParam }) => fetchPosts(pageParam, authState?.id),
initialPageParam: 0,
getNextPageParam: (lastPage) => lastPage.nextPage,
});

const fetchNext = useCallback(async () => {
const res = await fetchNextPage();
if (res.isError) {
      console.error("fetchNextPage Error", res.error);
    }
  }, [fetchNextPage]);
isPageEnd를 정의해서 페이지 하단에 뷰 포트가 교차됐는지 여부를 확인한다. queryFn을 정의할 때 pageParam은 최초에 기본으로 0을 넣어준다(initialPageParam: 0). fetchNextPage 함수를 useCallback으로 감싼 이유는 리렌더링이 발생할 때마다 새로 정의될 필요가 없기 때문이다. 감싸지 않아도 동작에는 문제 없다. 데이터 변화에 따라 동적으로 페이지를 클라이언트 사이드에서 리렌더링 해야 하므로 핵심 로직은 useEffect에 추가한다.
useEffect(() => {
let timerId: NodeJS.Timeout | undefined;
if (isPageEnd && hasNextPage) {
  timerId = setTimeout(fetchNextPage, 100);
}

return () => clearTimeout(timerId);
}, [fetchNextPage, hasNextPage, isPageEnd]);
setTimeout을 넣은 이유는 혹시라도 데이터 페칭이 오래 걸릴 때를 대비한 장치이긴 한데 fetchPosts가 이미 비동기 함수로 정의되어 있기 때문에 크게 의미가 없을 수 있다. 페이지 하단에 도달하면서(isPageEnd) 다음 페이지가 있을 경우(hasNextPage)에만 다음 데이터를 페칭하기 때문에 무한 스크롤이 동작한다.
백엔드
백엔드 입장에서는 페이지네이션과 동일하다. 그러므로 Page 객체를 사용해서 데이터를 페이지 단위로 쪼개서 가져오면 된다. 해당 비즈니스 로직은 PostService에 구현한다. react-query에서 getNextPageParam에서 사용할 nextPage를 계산하기 위한 함수가 getNextPage().
public List<PostResponseDto> getPosts(int pageNumber) {
return postRepository.findAllByOrderByCreatedAtDesc(
        PageRequest.of(pageNumber, PAGE_TEST_SIZE)) // PAGE_TEST_SIZE는 3
    .map(
        post -> new PostResponseDto(
            post.getId(),
            post.getTitle(),
            post.getUser().getAuthor(),
            post.getUser().getDescription(),
            post.getBody(),
            post.getCreatedAt(),
            false)
    ).toList();
}

public @Nullable Integer getNextPage(int pageNumber) {
    long count = postRepository.count();
    long pageCount = (long) Math.ceil((double) count / PAGE_TEST_SIZE);
    return pageNumber + 1 <= pageCount ? pageNumber + 1 : null;
}
이제 컨트롤러에서 데이터 맵핑만 제대로 해주면 된다.
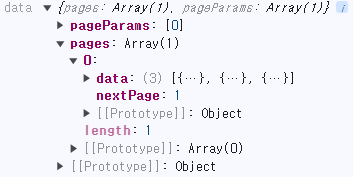
  @GetMapping("/list")
  public ResponseEntity<Map<String, Object>> getAllPosts(
      @RequestParam Integer page,
      @RequestParam(required = false) String userId) {

    Integer nextPage = postService.getNextPage(null != page ? page : 0);

    Map<String, Object> response = new HashMap<>();
    List<PostResponseDto> list;

    if (null == userId) {
      list = postService.getPosts(null != page ? page : 0);
    } else {
      list = postService.getPostsWithLikes(null != page ? page : 0, Long.parseLong(userId));
    }

    response.put("data", list);
    response.put("nextPage", nextPage);

    return ResponseEntity.ok(response);
  }
nextPage라는 키로 다음 페이지 정보를 지정해준다. 데이터를 "data" key로 지정했는데 이는 프론트엔드에서 다음처럼 접근한다. 다음과 같이 반복문을 두 번 타는 이유는 아래의 이미지에서 응답 데이터 구조를 확인해보면 알 수 있다. 리액트에서 반복문을 두 개 이상 탈 때는 필요에 의해 div 등의 엘리먼트를 넣거나 Fragment를 넣으면 된다.
return (
<div className="posts">
  {data?.pages?.map((item, index) => (
    <React.Fragment key={index}>
      {item.data.map((post: PostProps) => ( // data 키로 맵핑한 데이터
        <PostBox post={post} key={post.id} />
      ))}
    </React.Fragment>
  ))}
  <div className="posts__bar" ref={ref}></div>
</div>
);
useInfiniteQuery로 데이터를 받으면 구조가 다음과 같다. react-query에서 데이터를 pages에 넣어준다. 우리가 data라는 이름으로 맵핑한 데이터가 pages 하위에 존재한다.
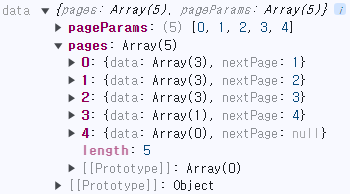
pageParam에는 페이지의 정보가 배열 형태로 들어간다. 때문에 페이지가 추가되면 다음처럼 된다.
'개발 > React' 카테고리의 다른 글
React library with rollup invalid hook uncaught type error reading property of null(useState) npm link (0) 2022.12.09 [Hooks] useState 간단 원리 (1) 2022.09.23 [React] 한글 입력 시 onKeyDown 이슈 (2) 2022.08.26 [Recoil] 공식 문서 selector(async) 예제 간단 풀이 (0) 2022.08.18 [React-router-dom] 페이지 변환 시 파라미터 반환 받기 (0) 2022.08.11